Windows
How to configure Control D on any Windows computer.
Automatic Setup (GUI)
Want to spend the least amount of time setting up Control D on a Windows device? We probably read your mind.
GUI Setup Utility is what you're looking for.
Automatic Setup (CLI)
GUI is not your thing, or looking to do a scripted deployment? Have no fear, there is an app for that.
Command Line Daemon is what you're looking for.
Automatic Setup (YogaDNS)
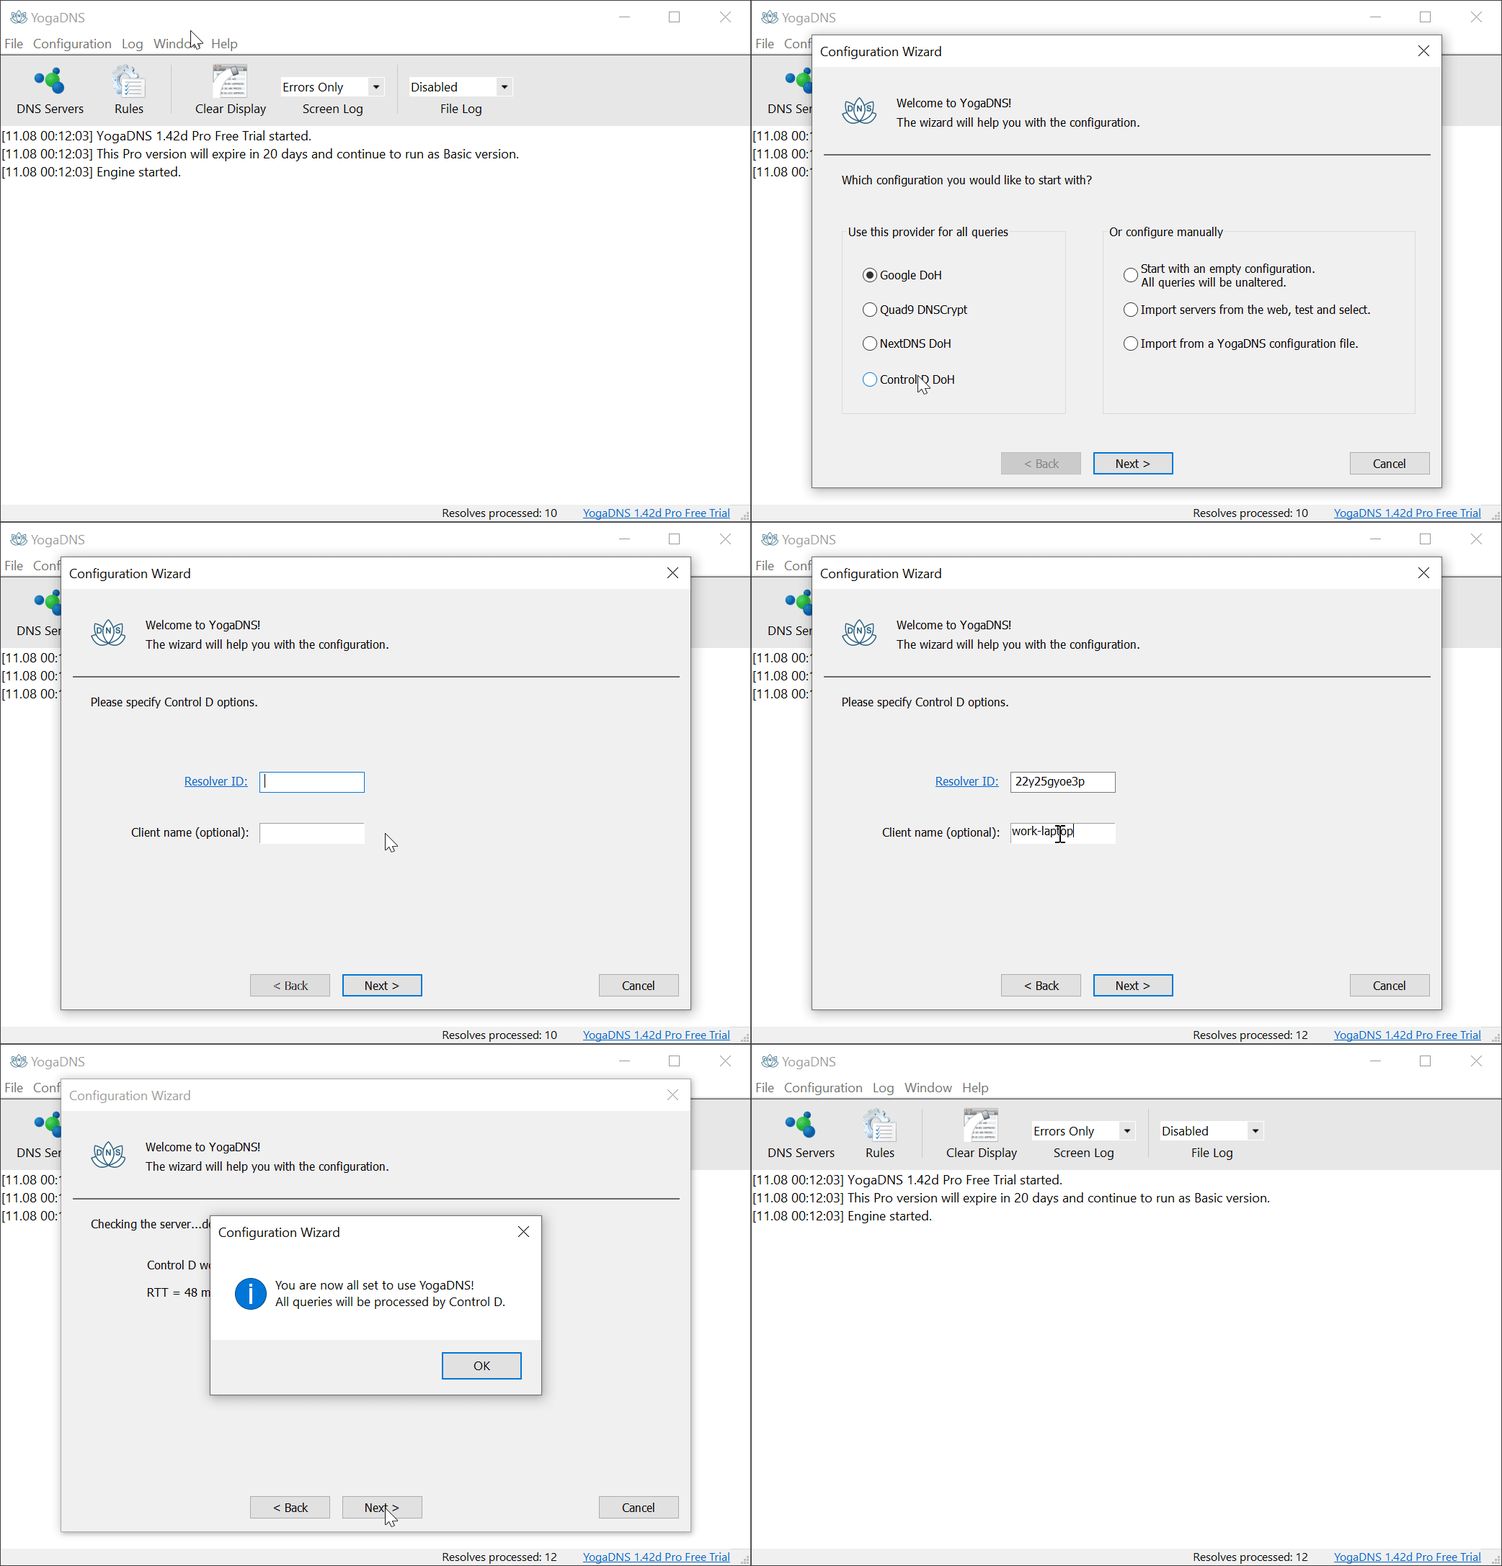
Launch YogaDNS and navigate to Configuration > Configuration Wizard. Select Control D DoH as the provider. Enter your Control D resolver ID and an optional client name. YogaDNS will work seamlessly to route your queries via Control D.

Manual Setup
Want to do everything manually? We understand, some of us still drive stick shift. There are a few ways to do it.
PowerShell (Legacy DNS)
If you're looking for a 1 liner command to configure Legacy DNS on an interface, this is it. The following example will configure 76.76.2.2 (free ad-blocking DNS resolver - yours will be different) on the default network interface. Be sure to run this in Admin prompt.
Get-WmiObject -Class Win32_IP4RouteTable | where { $_.destination -eq '0.0.0.0' -and $_.mask -eq '0.0.0.0'} | Sort-Object metric1 | select interfaceindex | set-DnsClientServerAddress -ServerAddresses ('76.76.2.2')Wow, that was easy.
To Revert DNS Changes via PowerShell
Open PowerShell as Administrator:
- Press Win + X and select "Windows PowerShell (Admin)" or "Windows Terminal (Admin)" if you're on a newer version.
Run the following command to revert back to obtaining DNS server addresses automatically:
Get-WmiObject -Class Win32_IP4RouteTable | where { $_.destination -eq '0.0.0.0' -and $_.mask -eq '0.0.0.0'} | Sort-Object metric1 | ForEach-Object {Set-DnsClientServerAddress -InterfaceIndex $_.InterfaceIndex -ResetServerAddresses}Explanation:
This script iterates through each network interface that has a default route (indicated by destination 0.0.0.0 and mask 0.0.0.0), and resets its DNS server addresses to the default settings. This should revert your DNS settings back to automatic configuration and effectively "uninstall" the manual DNS setup for Control D.
netsh (Legacy DNS)
Powershell not your thing? Sure, let's setup Legacy DNS another way. Fire up that Admin prompt.
List all interfaces and find the Interface you are currently using or want to change the DNS server on.
netsh interface ip show configHere we're gonna assume Ethernet0 and DNS server 76.76.2.2 (yours will be different).
netsh interface ipv4 set dns name="Ethernet0" static 76.76.2.2.... and you're done.
netsh (Secure DNS)
Compatibility WarningWindows 11 is required to execute these commands.
Running Windows 11 and wish to setup DNS-over-HTTPS? Good thinking, let's do that. Want a super detailed guide? Check out this blog post. Otherwise, fire up that Admin prompt.
First, let's create a DOH template. Keep in mind, your server and dohtemplate values will be different.
netsh dns add encryption server=76.76.2.2 dohtemplate=https://freedns.controld.com/p2List all interfaces and find the Interface you are currently using or want to change the DNS server on.
netsh interface show interface

Admin State    State          Type             Interface Name
-------------------------------------------------------------------------
Disabled       Connecting     Dedicated        Local Area Connection 3
Disabled       Connecting     Dedicated        VMware Network Adapter VMnet1
Enabled        Connected      Dedicated        Ethernet0
Disabled       Connecting     Dedicated        Wi-Fi
Choose the network that is both Enabled and Connected. Here we're gonna assume Ethernet0 and DNS server 76.76.2.2 (yours will be different).
netsh interface ipv4 set dns name="Ethernet0" static 76.76.2.2Now, for some reason you have to open the GUI Settings app, navigate to Network Settings, and edit your interface.
Go to DNS server assignment, choose manual IPv4, and choose the On (automatic template) drop-down menu option for DNS over HTTPS.
To revert netsh method:
netsh method:Open Command Prompt:
- Right-click the Start menu and select "Command Prompt (Admin)" or "Windows PowerShell (Admin)".
Run the command:
netsh interface ipv4 set dns name="Ethernet0" dhcp
- This command sets the DNS back to being obtained automatically via DHCP.
- If this doesn't solve it, you might have used the command with some different interface name.
To find the correct interface name, run:
netsh interface ipv4 show config
- Look for the DNS settings and interface name and then apply the command accordingly.
Updated 3 months ago