
Org: Mass Provisioning
Looking to deploy Control D on a fleet of devices? This section is for you.
Organizations OnlyAn Organization account is required to use this feature.
What is Mass Device Provisioning
This feature allows you to generate a provisioning code, and use it to deploy Control D to hundreds of Windows, Mac and Linux devices using a single command using your favorite RMM platform.
Create Provision Code
Within the relevant Organization, go to the Endpoints section and click on the Provision icon.

You will see your existing provisioning codes, or an empty page.
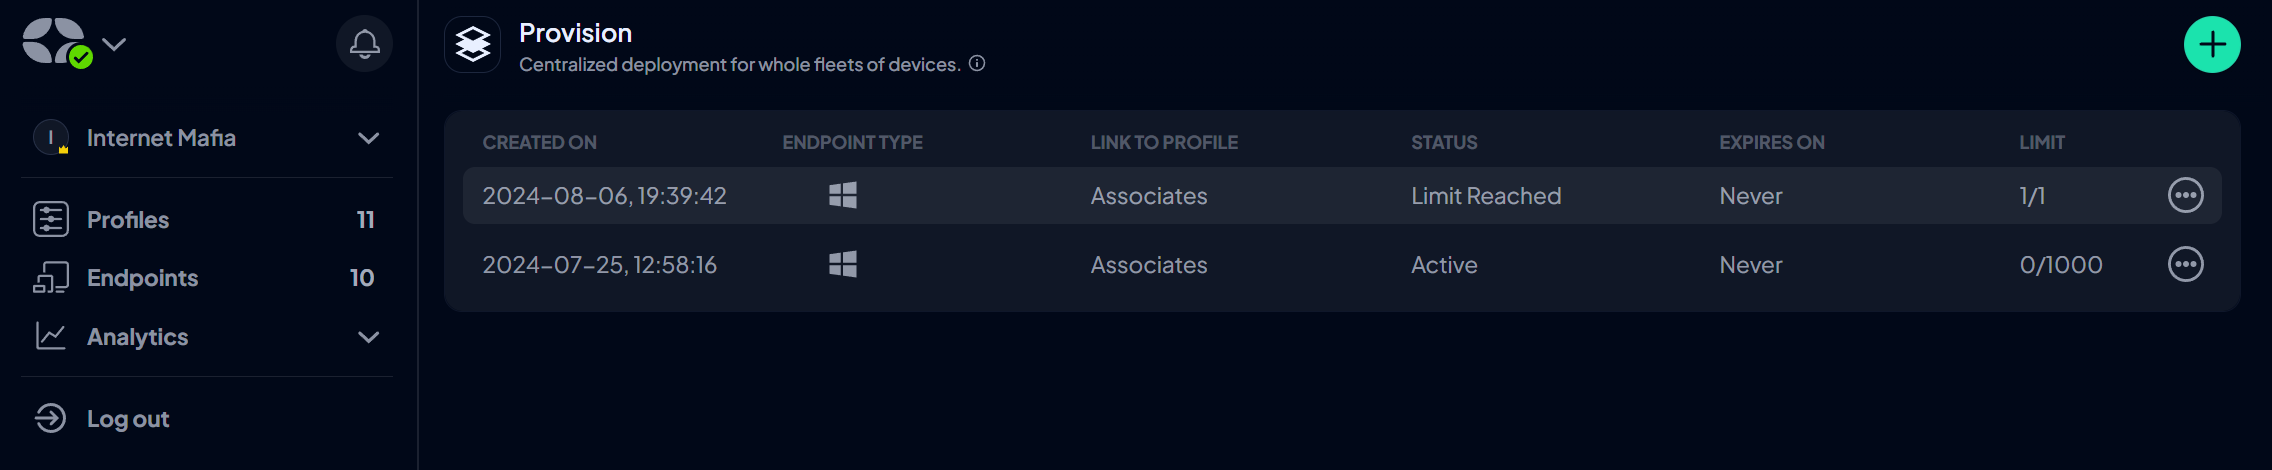
Click the green + button at the top to create a new code.

Fill out the appropriate fields, which are defined as follows:
- Endpoint Type - What kind of devices you're provisioning: Windows, Mac or Linux
- Enforced Profile - What Profile you wish to enforce on these Devices
- Expires After - How long this code should be usable for. After this time passed, the code cannot be used anymore
- Limit - How many devices you expect to provision. The code will become expired once this limit is reached
- Endpoint Name Prefix - Optional name prefix for this batch of Endpoints. The name will be the OS hostname appended to the prefix. For example, if you use
admin-as the prefix, and the machine hostname is "Bob-PC" then the final Device name that you will see in the web panel will be:admin-Bob-PC - Advanced: Analytics - Desired Analytics Level
- Advanced: Prevent Deactivation - Set a PIN code that must be supplied in order to uninstall the ctrld daemon.
- Advanced: DNS Intercept Mode - Handle VPN & DNS conflicts gracefully, if your endpoints run corporate VPNs or overlay networks.
Windows Setup
Once you create a code, you will be shown with usage instructions. If you selected Windows, you will see a modal like this.
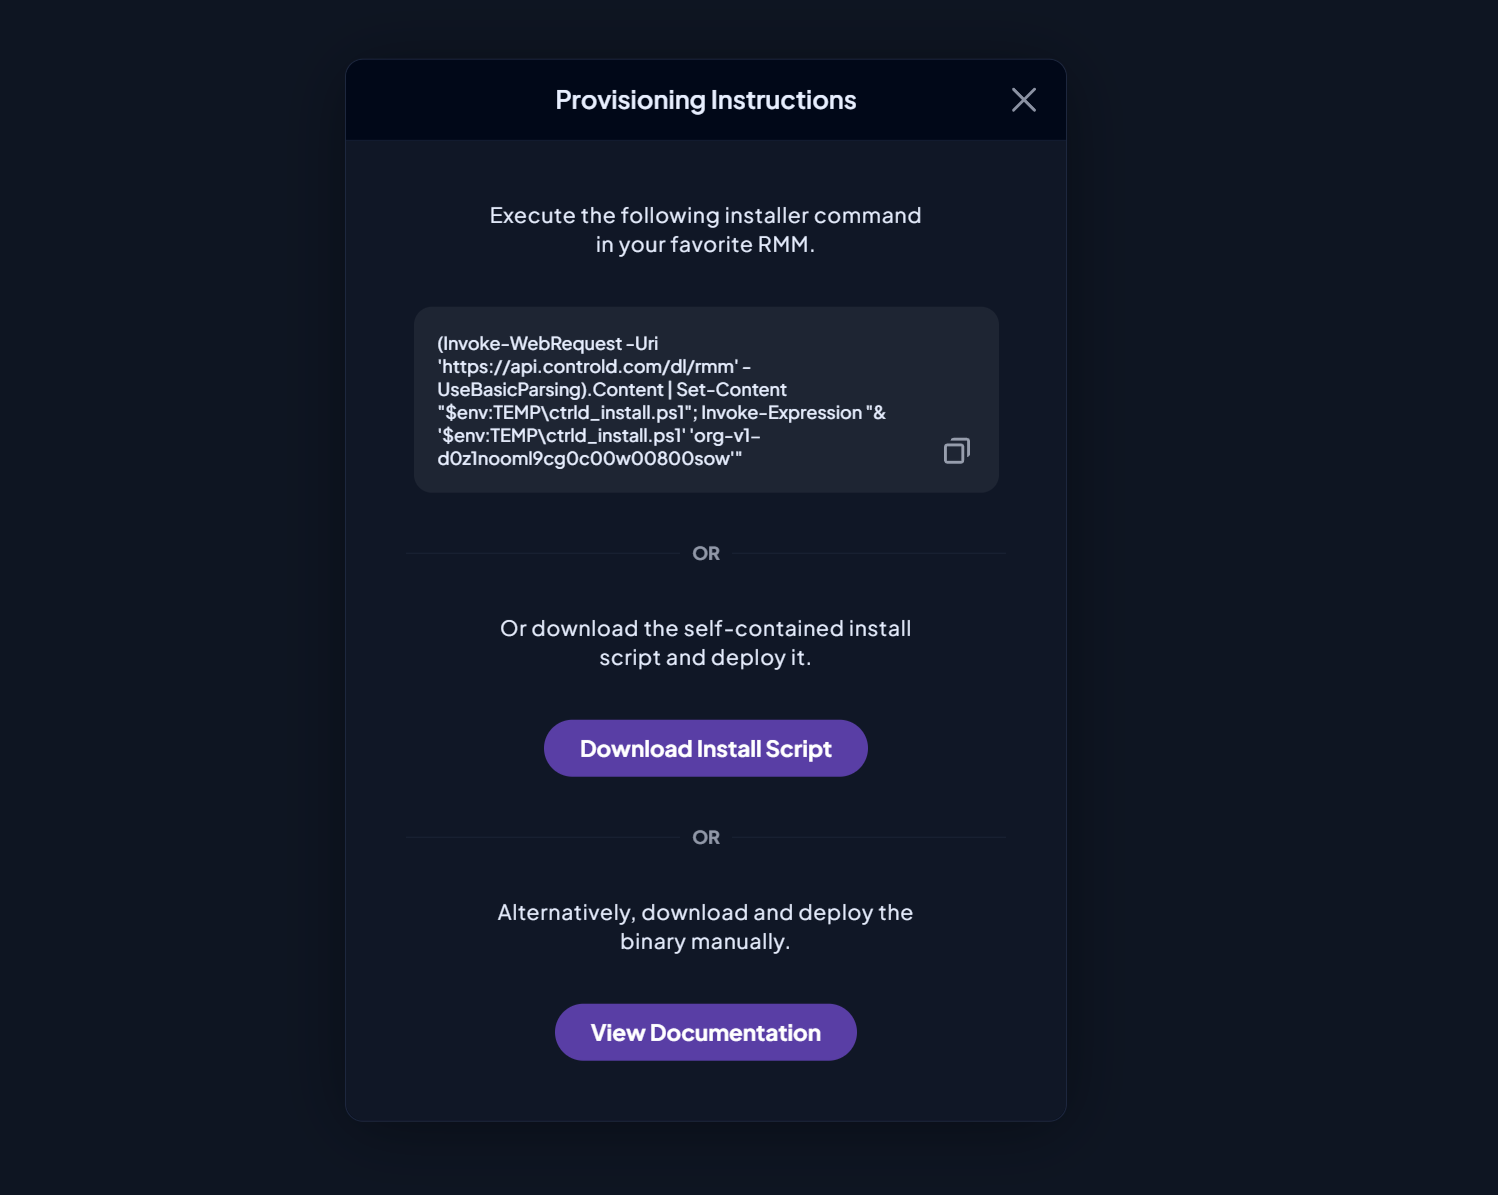
Automatic Setup - Installer
Simply copy the setup command and execute it on the desired endpoints using your favorite RMM tool.
(Invoke-WebRequest -Uri 'https://api.controld.com/dl/rmm' -UseBasicParsing).Content | Set-Content "$env:TEMP\ctrld_install.ps1"; Invoke-Expression "& '$env:TEMP\ctrld_install.ps1' 'CODE_GOES_HERE'"This 1-liner command will do the following:
- Download the Powershell installer script and execute it with the provisioning code as an arg
- The Powershell script will detect the machine architecture (386, AMD64, ARM64) and download the latest binary for it into
C:\ControlD, and add it to the system path. - Register and start a Windows service
- Once the service starts, it will contact the Control D API with the provisioning code, register an Endpoint, and configure DNS on the endpoint to use the DNS-over-HTTPS resolver for that Device
You're done. The endpoint should now be visible in the Endpoints section.
Custom Endpoint NameBy default, the machine hostname will become the endpoint name. If you wish to set a dynamic and custom name instead, supply this name as a 3rd arg in the install script.
(Invoke-WebRequest -Uri 'https://api.controld.com/dl/rmm' -UseBasicParsing).Content | Set-Content "$env:TEMP\ctrld_install.ps1"; Invoke-Expression "& '$env:TEMP\ctrld_install.ps1' 'CODE_GOES_HERE' standard 'custom-name-goes-here'"or
(Invoke-WebRequest -Uri 'https://api.controld.com/dl/rmm' -UseBasicParsing).Content | Set-Content "$env:TEMP\ctrld_install.ps1"; Invoke-Expression "& '$env:TEMP\ctrld_install.ps1' 'CODE_GOES_HERE' intercept-dns 'custom-name-goes-here'"Make sure the custom name is unique, or there will be conflicts.
Automatic Setup - Script
Alternatively, you can download the self-contained installation ps1 script using the Download Install Script button.
This script can then be deployed via your RMM and executed without any args. It will perform the same installation as in the Installer step.
Manual Setup
If you don't use wish to use the 1 liner installer or Powershell for that matter, or have compatibility issues (let us know!) you can achieve the same thing with a few extra steps.
- Head over to GitHub and download the latest release binaries for your desired architecture
- Deploy the executable to the desired location of your target endpoints using your favorite RMM tool or manually. We recommend
C:\ControlD\ctrld.exe - Execute the "Start the service" command
ctrld.exe start --cd-org CODE_GOES_HEREThis will perform steps 3-4 from the Automatic Setup.
Alternatively, you can use the specific Resolver ID from the relevant Device, instead of the Provision code. The command would be like so:
ctrld.exe start --cd RESOLVER_ID_HERE
System path not includedManual flow does not create a system path for the ctrld.exe executable. You will have to execute ctrld start --cd-org xxxxx command using an absolute path. ie.
C:\ControlD\ctrld.exe start --cd-org xxxxxxx
MacOS Setup
Once you create a code, you will be shown with usage instructions. If you selected Mac (or Linux), you will see a modal like this.
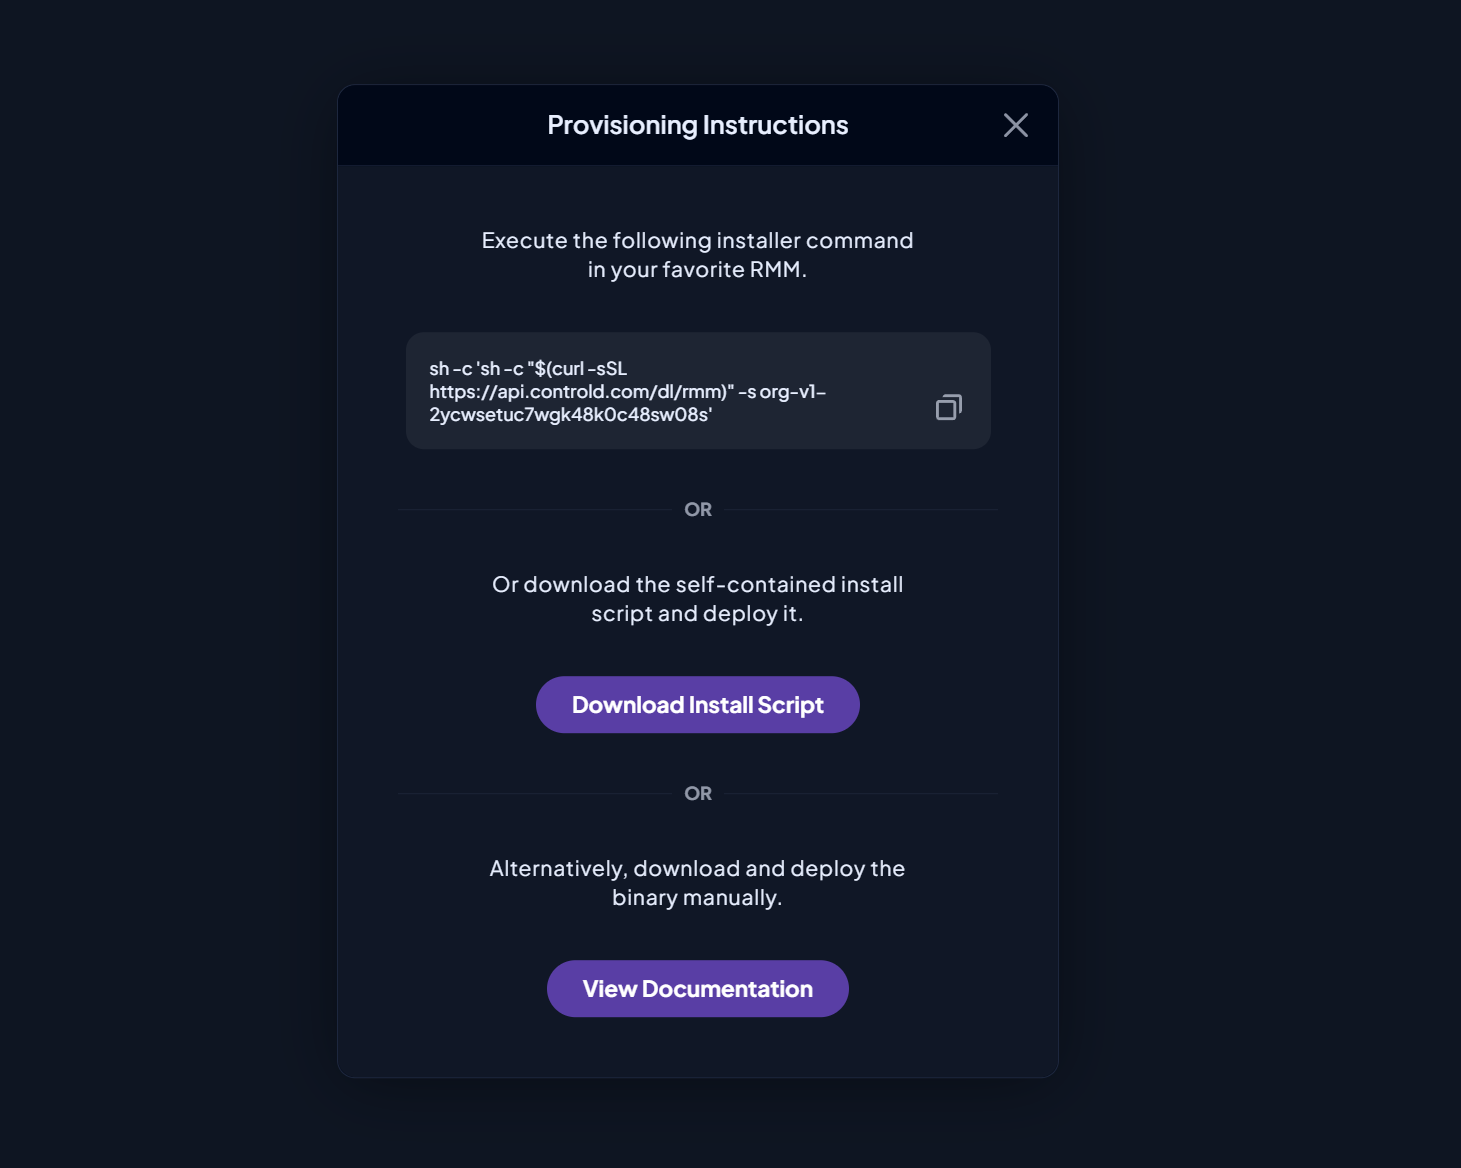
Automatic Setup - Installer
Simply copy the setup command and execute it on the desired endpoints using your favorite RMM tool.
sh -c 'sh -c "$(curl -sSL https://api.controld.com/dl/rmm)" -s CODE_GOES_HERE'This 1 liner command will do the following:
- Download the bash installer script and execute it with the provisioning code as an arg
- The bash script will detect the machine architecture and download the latest binary for it into
/usr/local/bin - Register and start a system service
- Once the service starts, it will contact the Control D API with the provisioning code, register a Device, and configure DNS on the endpoint to use the DNS-over-HTTPS resolver for that Device
You're done. The endpoint should now be visible in the Endpoints section.
Custom Endpoint NameBy default, the machine hostname will become the endpoint name. If you wish to set a dynamic and custom name instead, supply this name as a 3rd arg in the install script.
sh -c 'sh -c "$(curl -sSL [https://api.controld.com/dl/rmm](https://api.controld.com/dl/rmm))" -s CODE_GOES_HERE standard custom-name-here'or
sh -c 'sh -c "$(curl -sSL [https://api.controld.com/dl/rmm](https://api.controld.com/dl/rmm))" -s CODE_GOES_HERE intercept-dns custom-name-here'Make sure the custom name is unique, or there will be conflicts.
Automatic Setup - Script
Alternatively, you can download the self-contained installation bash script using the Download Install Script button.
This script can then be deployed via your RMM and executed without any args. It will perform the same installation as in the Installer step.
Manual Setup
If you don't use wish to use the 1 liner installer, or have compatibility issues (let us know!) you can achieve the same thing with a few extra steps.
- Head over to Github and download the latest release binaries for your desired architecture
- Deploy the executable to the desired location of your target endpoints using your favorite RMM tool
- Execute the "Start the service" command
ctrld start --cd-org CODE_GOES_HEREThis will perform steps 3-4 from the Automatic Setup.
Linux Setup
The instructions are identical to MacOS. Please use the above guide.
Code Management
When you land on the Provision page, you can view the states of all your provisioning codes and perform various actions.
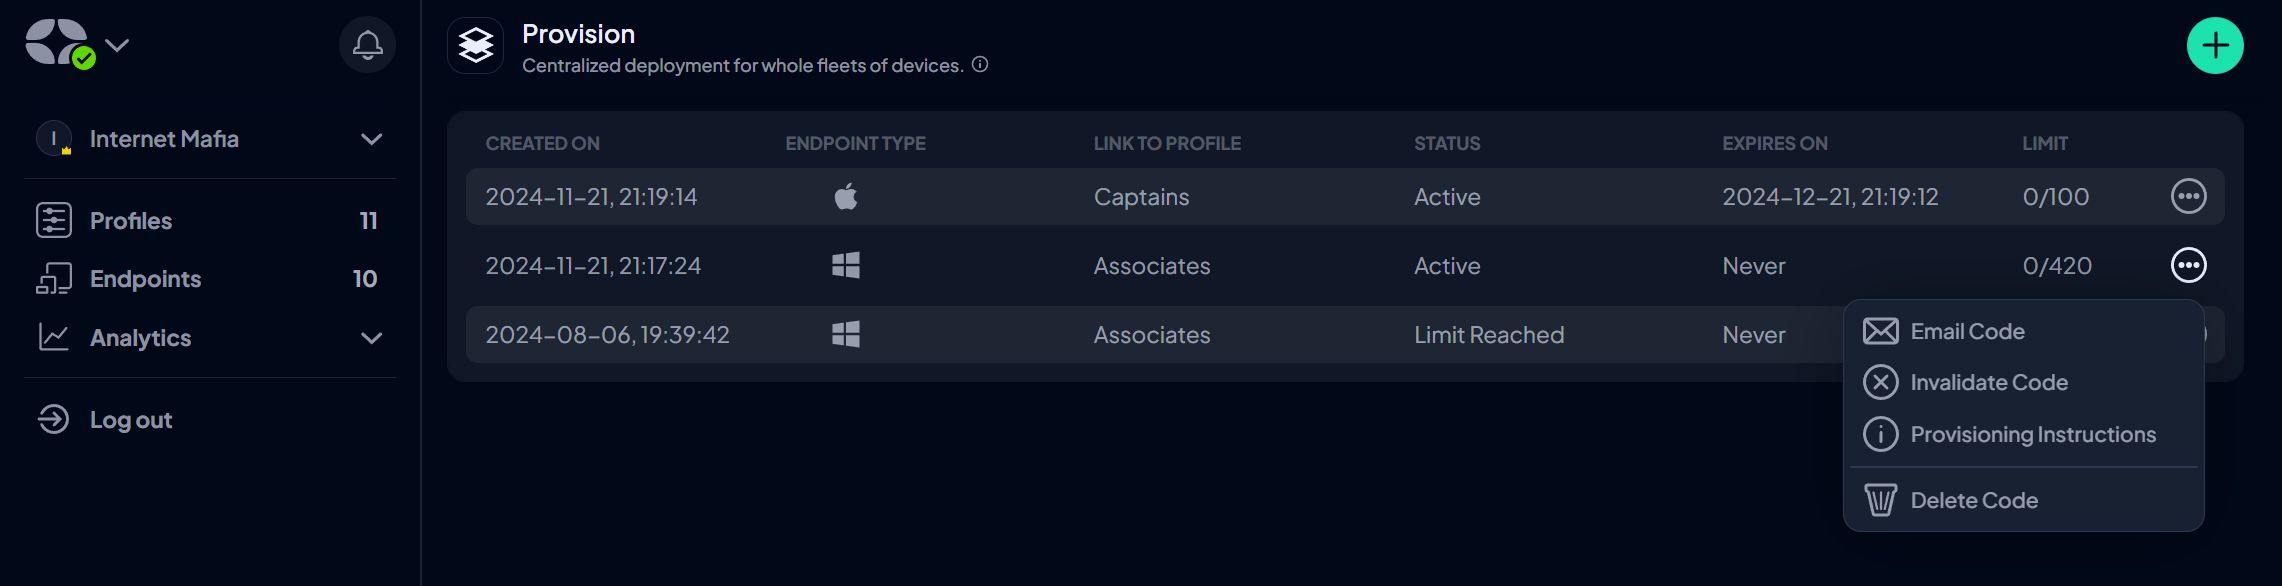
- Email Code - This will open a modal, where you can input the email of the end user to self-provision their endpoint. This is only useful if the end-user has admin rights to their machine.
- Invalidate Code - This will prevent the code from working any further, regardless of the limit or expiry not being reached
- Provisioning Instructions - Display the modal that shows you how to use this feature.
- Delete Code - Same as Invalidate Code, but will also remove the record from this view
Upgrade
To upgrade the daemon to the latest version, simply execute this command using your RMM tool:
ctrld upgradeIf ctrld is not in your system path, you will need to run it from an absolute location.
Removal
To remove the daemon from the target machine, simply execute this command using your RMM tool:
ctrld uninstallThis will stop and remove the system service, and put back the DNS settings to OS defaults. The binary will still remain on disk, but will no longer do anything until you run the start command again. To remove all files from disk, append --cleanup flag to the uninstall command.
Alternatively, you can delete the Endpoint from the Dashboard and ctrld will self-uninstall after a few seconds/minutes.
Updated 5 months ago