
SSO: OIDC with Okta
This guide walks you through the steps to configure Single Sign-on using OIDC with Okta.
Prerequisites
Before you begin, ensure you have admin access to your Okta dashboard.
Step 1: Set Up an Okta Application for Control D
Note: If you intend to use specific controld-* groups (e.g., controld-admin, controld-owner, controld-viewer) for role-based access, create these groups first as outlined in Step 3.
-
Log in to your Okta Admin Dashboard.
-
Navigate to Applications and click Create App Integration.
-
Select OIDC - OpenID Connect as the sign-in method and choose Web Application as the application type. Click Next.
-
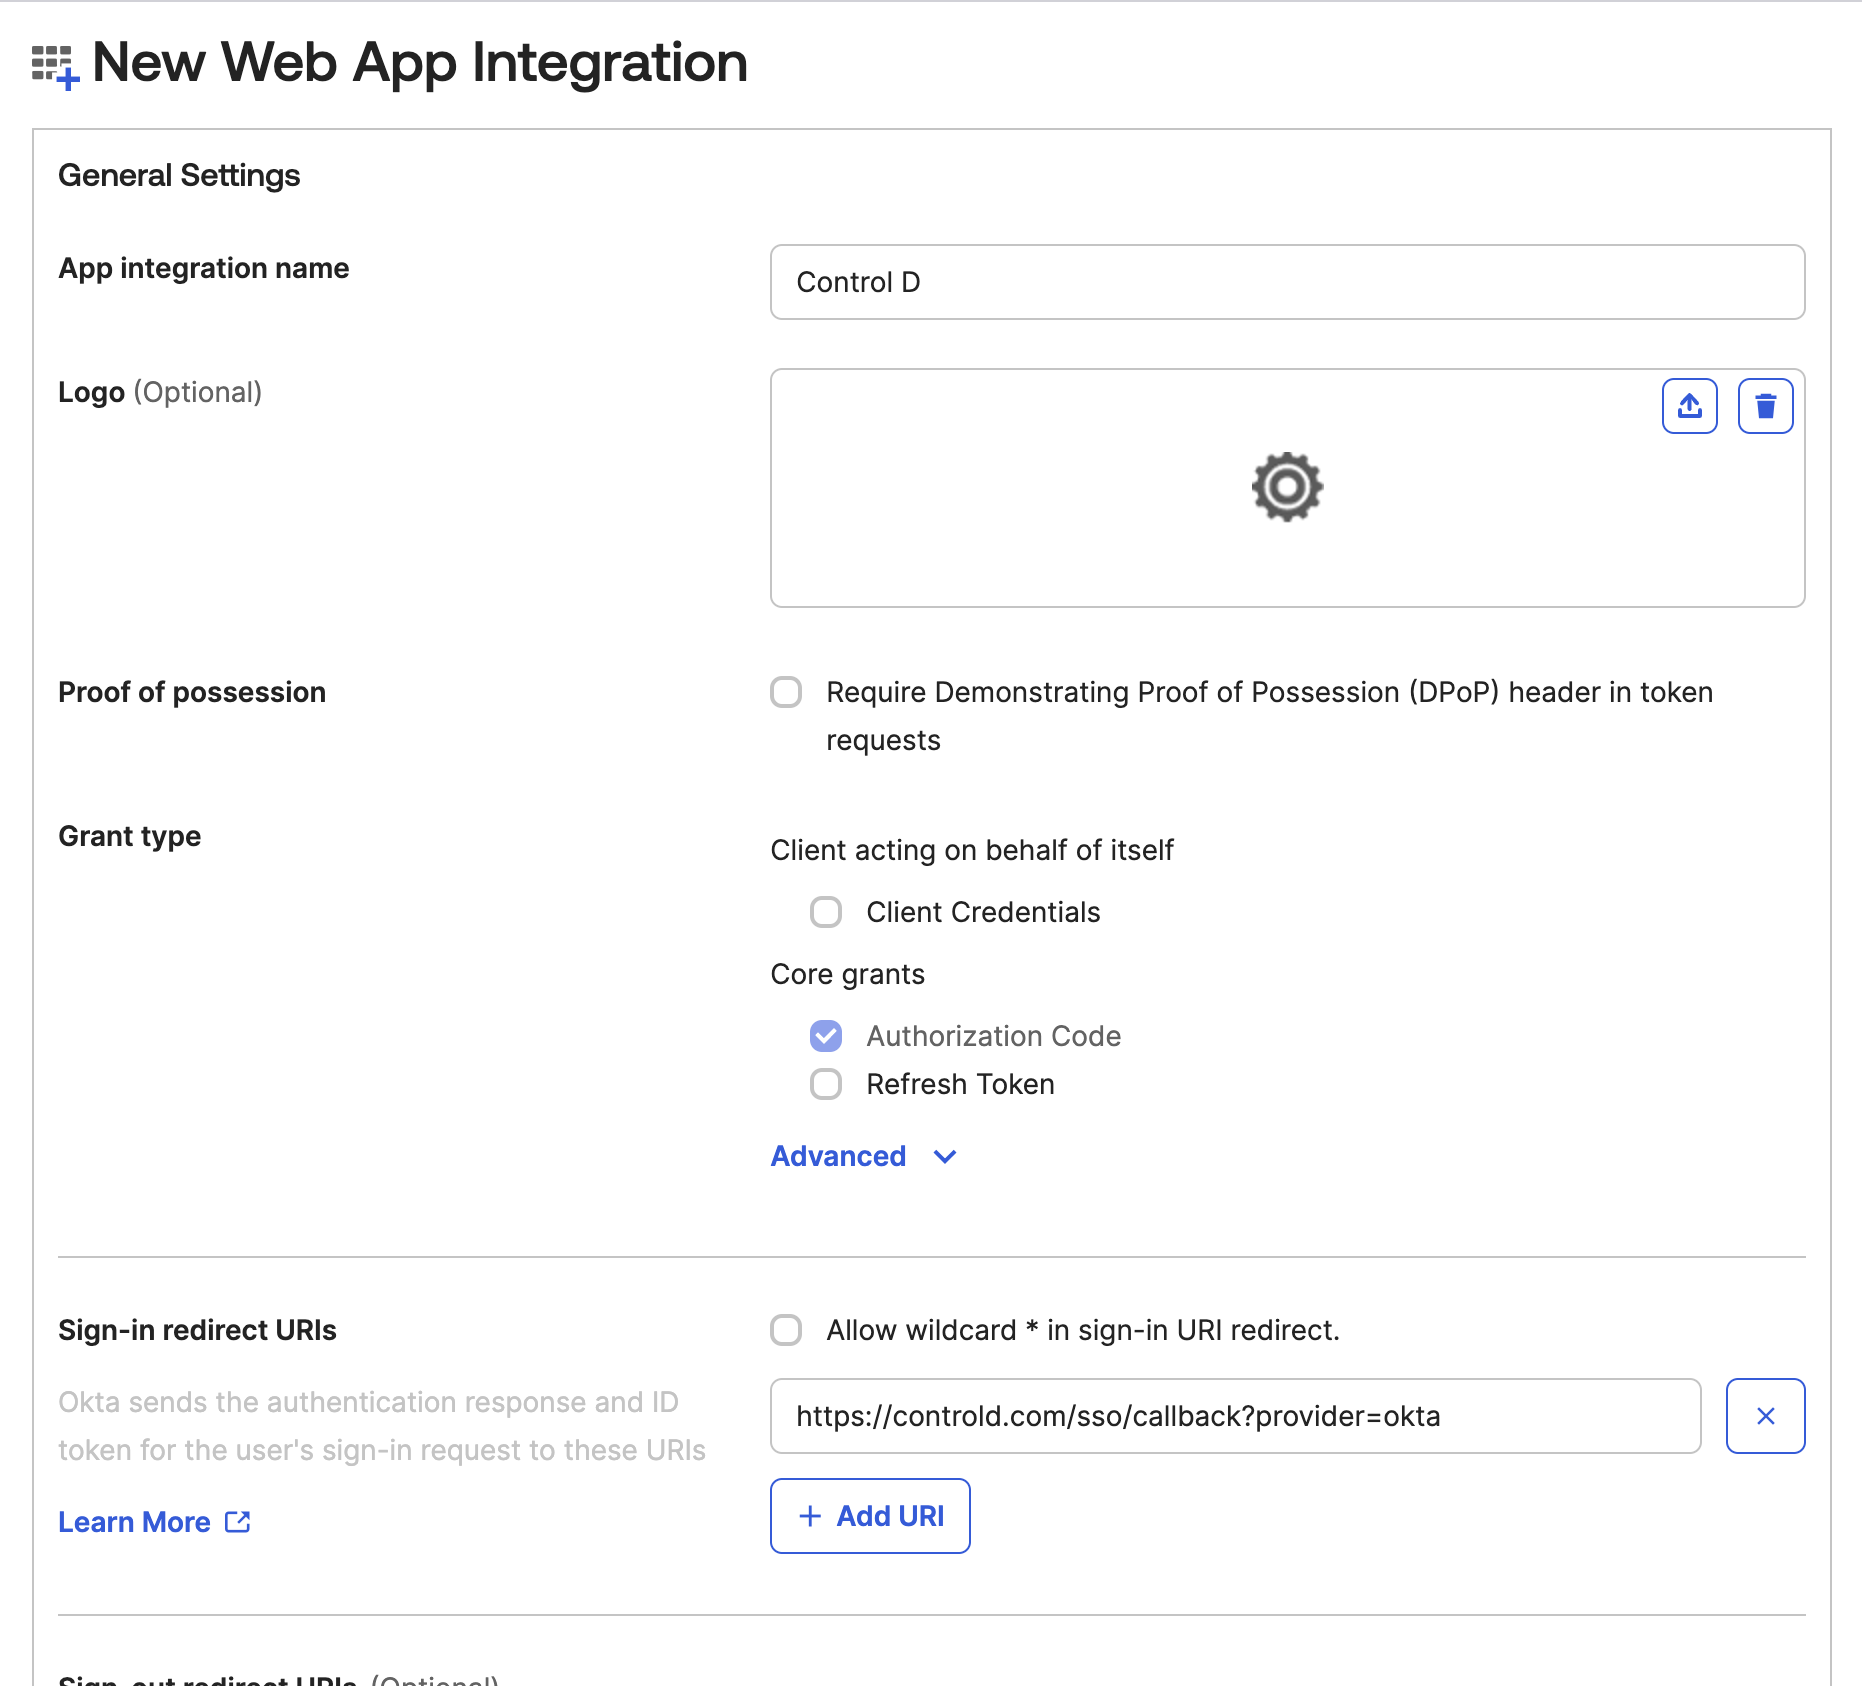
Fill in the application details:
Field Data App Integration Name Control D Logo (Optional) 
Sign-in redirect URIs https://controld.com/sso/callback?provider=oktaSign-out redirect URIs Delete all entries
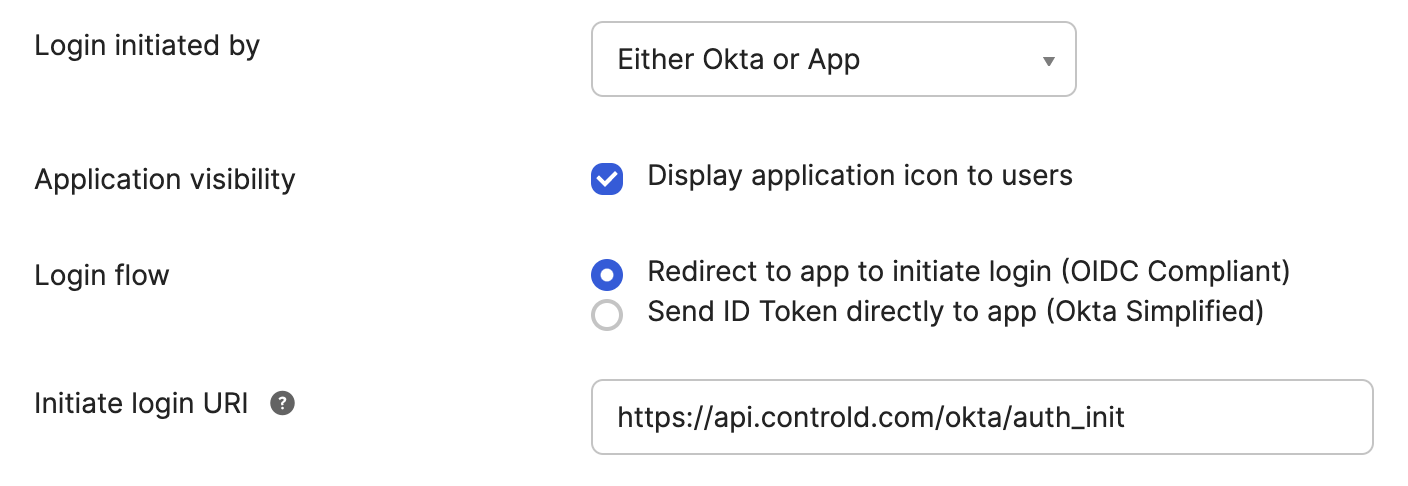
For IDP Initiated Login supportThis allows for one-click login from the Okta user homepage
Field Data Login initiated by Either Okta or App Application visibility Display application icon to users Login flow Redirect to app to initiate login (OIDC Compliant) Initiate login URI https://api.controld.com/okta/auth_init
- Under Assignments, you can assign people or groups to the application, or select Skip group assignment for now if you wish to assign them later.
If you plan to use role-based groups, assign thecontrold-*groups (controld-admin,controld-owner,controld-viewer) created earlier.
ControlD.*andcontrold-*are both supported group formats.
- Ensure the Grant Type is set to Authorization Code.
- Leave the Okta API Scopes tab unconfigured. Control D does not call the Okta Management APIs. It requests the standard OIDC scopes
openid,profile,email, andgroupsduring sign-in instead. - Click Save to create the application.
Step 2: Configure the Okta Application for Control D
-
Open the newly created Control D application in Okta.
-
Go to the General Settings tab and note down the Client ID and Client Secret.
-
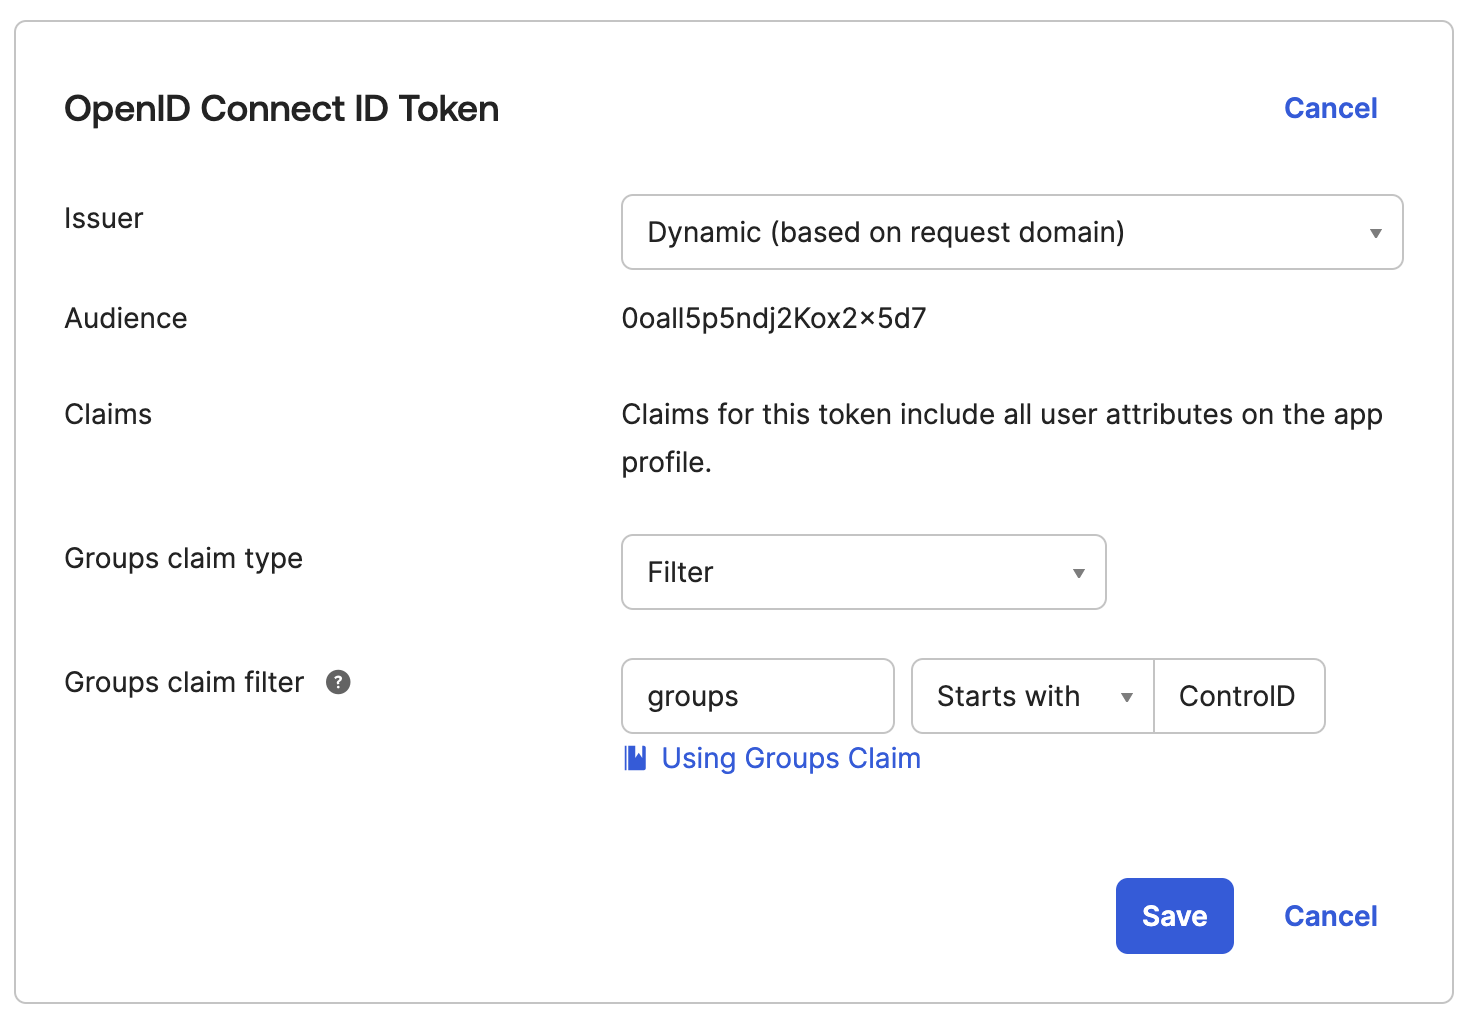
Go to the Sign On tab and ensure the OpenID Connect ID Token option is enabled.
-
Under Groups Claim, leave the claim name as
groups, set Groups claim type to Filter, choose Starts With, and entercontrold. This includes the defaultcontrold-admin,controld-owner, andcontrold-viewergroups. -
Save the claim.
Step 3: Assign User Groups in Okta
By default, create one Control D group for each role. If you want to map your organization's existing groups instead, skip this section and follow Optional: Map Existing Okta Groups to Control D Roles.
-
Go to Directory > Groups in Okta.
-
Create three groups for Control D access (if not already created). The default names are:
controld-admincontrold-ownercontrold-viewer
-
Assign users to these groups based on their roles and responsibilities within Control D.
Learn about the different roles and permission levels here: https://docs.controld.com/docs/org-members-permissions#permission-levels
Optional: Map Existing Okta Groups to Control D Roles
Use this option instead of creating the default controld-* groups. Control D can map three existing Okta-native or directory-imported groups to its Owner, Admin, and Viewer roles.
-
On the Control D application's Sign On tab, configure one active ID-token claim named exactly
groups. Set Groups claim type to Expression and use the.![name]projection shown below. -
Choose which memberships Okta sends:
-
All Okta-native and directory-imported groups:
user.getGroups({'group.type': {'OKTA_GROUP', 'APP_GROUP'}}).![name]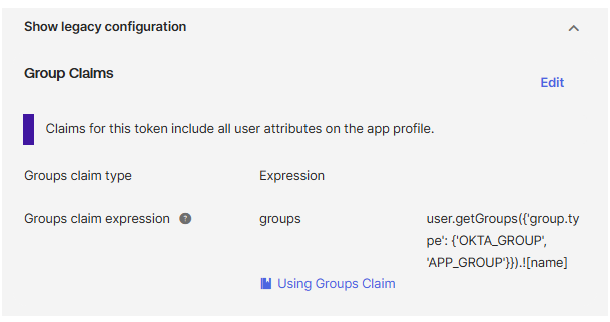
-
Only the three groups mapped to Control D roles (recommended): Replace these examples with the exact names of your existing groups:
user.getGroups(
  {'group.type': {'OKTA_GROUP', 'APP_GROUP'}},
  {
    'group.profile.name': {
      'Example.ControlD.Owner',
      'Example.ControlD.Admin',
      'Example.ControlD.Viewer'
    },
    'operator': 'EXACT'
  }
).![name]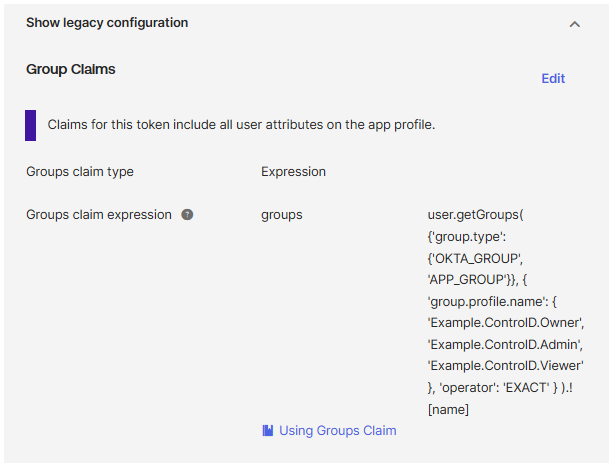
-
-
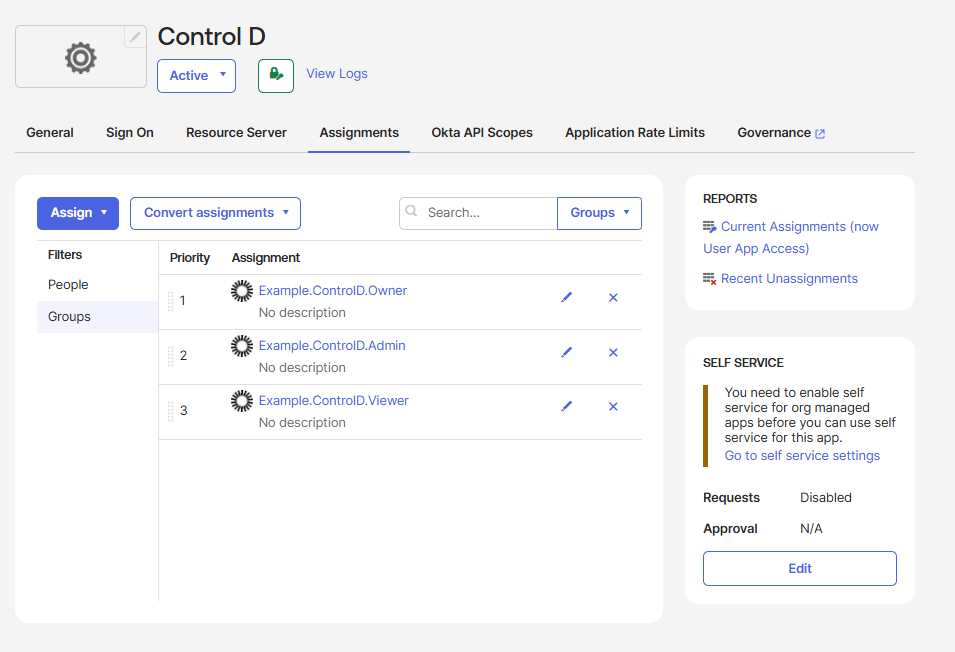
Assign the existing groups to the Control D application so that their members can launch it. Application assignment controls access to the application; it does not add a group to the ID-token claim or override the expression.
-
In Step 4, enter the three exact group names in the Owner Group, Admin Group, and Viewer Group fields. Matching is case-sensitive. If a user belongs to multiple mapped groups, Control D applies the highest role in this order: Owner, Admin, then Viewer.

See Okta Expression Language group functions for additional filtering options. Okta's Token Preview under Security > API > Authorization Servers is for custom authorization servers and does not reproduce Control D's org authorization server flow.
Step 4: Add SSO Configuration in Control D
-
Log in to the Control D.
-
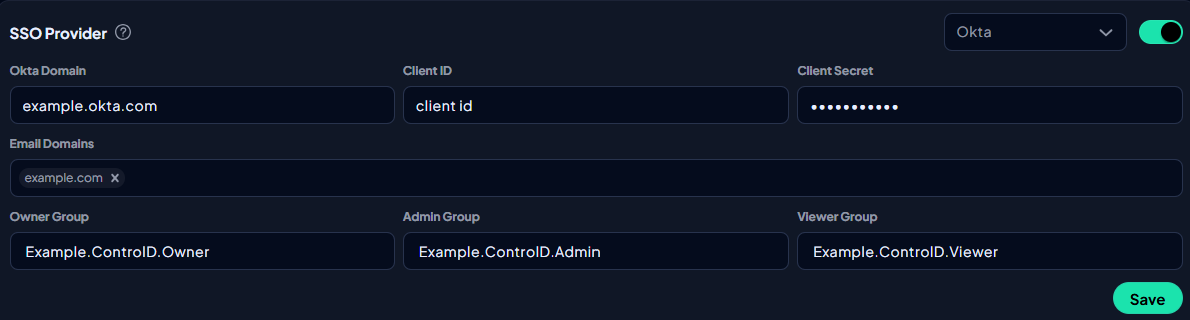
Navigate to My Organization, scroll to SSO Provider, and click the toggle to enable.
-
Fill in the required fields:
- Okta Domain:
<your-subdomain>.okta.com - Client ID: The value you copied from the Okta application.
- Client Secret: The value you copied from the Okta application.
- Email Domains: Enter the domains associated with your organization, e.g.,
example.com. This is necessary to map email domains to your Control D customer account so that login attempts are redirected to the correct Okta authentication server. - Owner Group, Admin Group, and Viewer Group: To use custom group mappings, enter the corresponding Okta group name in all three fields. When adding SSO without a custom mapping, leave all three fields blank to use the default Control D group names.
- Okta Domain:
-
Click Save to enable Okta SSO for your organization.
Step 5: Test SSO Login
- Log out of Control D and navigate to the login page.
- Enter your Okta email address, leaving the password blank.
- Click the Log in with Okta button.
- Enter your Okta credentials and confirm successful login.
- Verify role-based access permissions by testing users in each of the three configured groups.
Troubleshooting
If you encounter any issues:
- Verify the redirect URIs in your Okta application settings.
- Confirm that the app has one active ID-token claim named exactly
groupsand that its expression includes the mapped groups. - Ensure the user is assigned to the expected groups and to the Control D application in Okta.
- Check the SSO configuration in the Control D Admin Panel for typos or missing fields. Group names are case-sensitive.
- Refer to the Okta logs for debugging SSO errors. Do not share raw ID tokens.
For additional support, contact Control D Support.
Updated about 1 month ago